Wednesday, June 12, 2024

Flexible workflow for purchase order

Flexible workflow allows us to define condition-based workflows for approval processes. For purchase orders, setting up automatic, one-step, or multi-step approval workflows has been made super simple. Once done, the approvers can then approve or reject the work items in the My Inbox app.

This blog is about our experience with Customization of flexible workflow for Purchase Orders, the issue we faced and the resolutions for the same. The below information can also be used as a reference for the configuration of flexible workflow for other scenarios.

Prerequisite:

  • Ensure that the automatic Customizing is active for the workflow functionality in SWU3 TCode.
  • My Inbox relevant customizing should be in place
  • Manage Workflows for Purchase order and Maintain Email template tile is available in the Fiori Launchpad

Now Let’s start with the step-by-step Journey!

  1. Open the Manage Workflow for Purchase Orders. The application is blank with the message “There are currently no scenarios available”.

  2. Go to the following the path in SPRO: SAPNETWEAVER–> Application Server –> Business Management –> SAP Business Workflow –> Flexible Workflow  –> Scenario Activation
  3. Maintain new entry for WS00800238 and set it as active


  4. If the issue on point 1 still persists assign the below authorization object:
    1. Authorization Object: S_WFFLXDEF
    2. SWFFLEXSCN -> Scenario Id (for example, WS00800157)
    3. ACTVT -> At least you will need to have authorization to display (03)
  5. This should solve the issue in point 1
  6. Click the Add button to create a new workflow for purchase orders. This will open the New workflow page

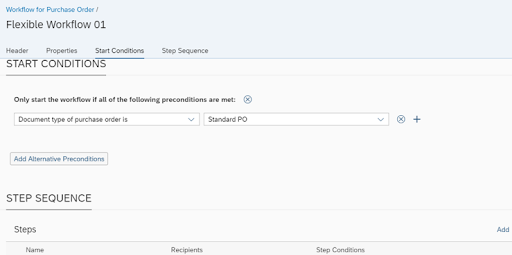
  7. Enter Workflow Name, Description, Valid From, Valid To. Enter the Start Condition for the workflow.

  8. To add the Step sequence click the add button in the Step Sequence Section. In the New Step page, Enter the Step Name and Step Type as Release of Purchase Order

  9. For Recipients Select User for Assignment By. For the user field, select a user from the Search help.
  10. If the search help return no data follow the below steps
    1. Activate HR Integration –> Goto SM30 –> Maintain table T77S0 –> search for entry group: HRALX, sem.abbr.: HRAC and set the value abbreviation value to X

    2. Go to the customizing path
      SPRO -> Cross-Application Components -> SAP Business Partner -> Business Partner -> Basic Settings -> Identification Numbers -> Define Identification Categories.
    3. unSet Identification Categories for HCM0001 for Disp. Only

    4. Check the below blog for the step by step instruction to fix this issue. Make sure to finish steps 10.i, 10.ii, 10.iii before going to the blog  employee as a business partner and synchronization with hr data   Once done the data will be visible in the search help


  11. In the Step Conditions tab, provide the relevant triggers for this specific step. We can provide as many conditions as we want, these conditions will be responsible for triggering this step
  12. No change is needed for Deadlines or Exception Handling, click the Add Button to Add the above step to the workflow.
  13. Click the Save button to save the workflow.
  14. Repeat Steps 8-9-11-12 to add additional steps to the workflow. Click the Activate Button for the workflow to be activated.

  15. Click the Define Order button to ensure that the workflow gets triggered if the Start conditions are met.

  16. Once done our workflow will appear on top.

    Significance of Order field: 
    If the start/trigger conditions of our workflow at order 1 are not met then it will check the start/trigger conditions of the workflow at order 2 (given the status is active) and so on. Now, let us test it!
  17. create a Purchase order in the Manage Purchase order application. We can see the Approval Details for the Purchase Order in the Approval Details tab.
  18. Open the My Inbox application for If the relevant task is not visible do the below steps
  19. In SPRO goto Materials Management –> Purchasing –> Purchase Order –> Flexible Workflow for Purchase Orders –> Activate Flexible workflow for Purchase Orders

  20. goto SAP Gateway Service Enablement –> Content –> Workflow Settings –> Maintain Task Names and Decision Options
    1. In the Step Name: Overview


    2. Select the above entry and click on Decision Keys and maintain the two Decision keys as below

  21. Assign Agents and Activate Event Linkages for Workflow ID WS 00800238 and TS 00800531
    1. SAP Netweaver –> Application Server –>  Business Management  –> SAP Business –>Workflow –> Perform task-specific Customizing
    2. Navigate to the SAP application component MM-PUR-PO
    3. Click Assign Agents –> select line with TS00800531 –> Click Attributes and select General Task–>clickTransfer


    4. Click Activate Event Linking–>Expand the hierarchy to display the relevant event for WS00800238 –>Activate the linkage for the listed event by clicking on the Deactivated button
    5. Once done the task will be visible in the My Inbox application, but still, there is no mail received by the recipient.
  22. Now let’s set up the Email transmission. The prerequisite to set up the Email is as below:
    1. In Transaction Code S_ATO_SETUP, set up Adaptation Transport organizer with specific data using YY1_ as prefix and sandbox prefix as YY9_.
    2. SOST and SCOT configuration should be in place
    3. Ensure Email address is maintained for the users in su01
  23. Open the Maintain Email Template application. In the pre-delivered section find the template SWF_CRT_NOTIFY_RECIPIENTS.
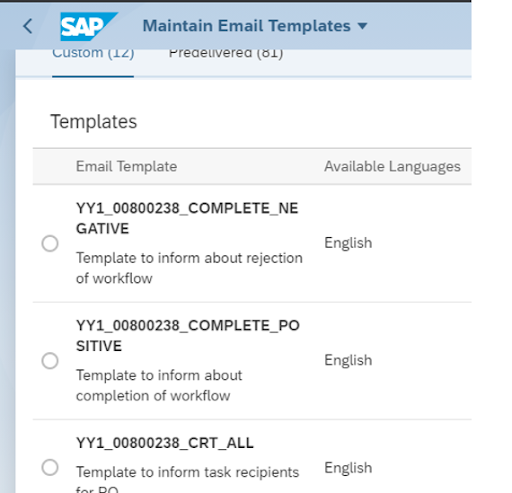
  24. Copy the above-mentioned template for each of the workflow scenarios. e.g. YY1_00800238_CRT_ALL for PO. This workflow template will be triggered to notify the recipients of the newly created PO, or whenever there is a PO task for approval.
  25. Copy the pre-delivered template SWF_WORKFLOW_COMPLETE_NOTIFY for each of the workflow scenarios. e.g. YY1_00800238_COMPLETE_POSITIVE for PO. These workflow templates will be triggered to notify the recipients of the completed POs, whether completed positively or negatively.

  26. Test again by creating a PO. If the mail is still not getting triggered Report RSWF_OUTPUT_MANAGEMENT needs to be executed manually with parameter productive in order to release the emails manually

With this, we conclude the configuration required for Flexible Workflow for Purchase Order including the email trigger functionality. Please do share in the comments if there are issues apart from the ones mentioned in the


Sales person ID create & Synchronize with SAP user id

 TCODE: PPOM._OLD       Position Create

1. Go to PA30


2. Select Actions Info-type and click create

3. Enter the Parameters as shown Below


4. Click save it will name next screen

5. Maintain Employee details


6. Click on save will take to next screen

7. Enter sub-area


8. Save


9. Maintain Address


10. Select main back (0)

11. Save


12. In the highlighted area select info type “communication” and sty “00001”

13. Click on Create


14. Enter the USER ID and save


NOW Employee is created with Personnel Number 


15. BP Creation Go to BP T.Code

16. Select BP Category as Person and BP Grouping as “BPEE”

17. Enter all the Parameters as per the requirement as shown Below


18. Once all details are filled click on check to validate details.

19. Go to Identification Tab


20. In ID Type enter HCM001 and previously created personal number in PA30 and click save

21. Now select FLNV00 role and click company code


22. Enter CC and Reconciliation account and scroll down


23. Enter the personal number and save

24. Now select FLVN01 Roll and select Pur.Org


25. Enter Pur.org and Order Currency and save

26. Now Select FS0000 roll and open company code and check its extended or not and save

27. Select BUP001 Role and check all address details are populating or not and save

28. With this BP is created


 Now Synchronization with EMP and BP

     Open SA38 Transaction

      1. Enter Program Name /SHCM/RH_SYNC_BUPA_EMPL_SINGLE
      2. And execute


    •  4. Give the personal number which is created in PA30 and run the program


    • 5. Now will check log in SLG1 Transaction
    • 6. Main below data in object and sub object fields

Object          SHCM_EE_INTEGRATION

Subobject    BUPA_SYNC


7. Once object & Sub-Object are maintained as shown Above execute the log.


  • 8. Now EMP ID and BP have Synced.
  • 9. Open SU01 Transaction


Tuesday, June 11, 2024

How to fix SAP GUI Security Pop Up when server action get denied for the file

 Generally users sees the below popup along with the error:

                                                              Error screenshot 1


                                                              Error screenshot 2


How to fix it


  1. From the SAP Logon pad select the folder icon as shown below & select "options"

  2. Then select Security folder & click on Security settings & Make sure it’s status is selected as "customized"

  3. Select open security configuration & search for the object name which you get in the error screen, try to select & edit.

  4. Select action as context dependent/ Allow & click on OK & Apply.

  5.  your access issue should be fixed.

Saturday, June 8, 2024

Collect data for active SAP users - program

 REPORT ZCOLLECT.

TABLES: UINFO, YUINFO.

DATA: OPCODE TYPE X VALUE 2, DATUM TYPE D, IDOPONT TYPE T.

DATA: BEGIN OF USR_TABL OCCURS 10.
        INCLUDE STRUCTURE UINFO.
DATA: END OF USR_TABL.

CALL 'ThUsrInfo' ID 'OPCODE' FIELD OPCODE
  ID 'TAB' FIELD USR_TABL-*SYS*.

DATUM = SY-DATUM.
IDOPONT = SY-UZEIT.

LOOP AT USR_TABL.
MOVE-CORRESPONDING USR_TABL TO YUINFO.
YUINFO-DATUM   = DATUM.
YUINFO-IDOPONT = IDOPONT.
YUINFO-SORSZAM = YUINFO-SORSZAM + 1.
INSERT YUINFO.
ENDLOOP.
COMMIT WORK.

Delay N seconds - report

REPORT ZDELAY.

* This program delays n seconds

DATA: TIM LIKE SY-UZEIT, N TYPE I VALUE 30.

TIM = SY-UZEIT.
TIM = TIM + N.
DO.
  GET TIME.
  IF TIM < SY-UZEIT.
    EXIT.
  ENDIF.
ENDDO.

Introduction To CDS Views


What is a CDS View?

CDS or Core Data Services are part of SAPs Code Pushdown approach where you try to do as much as possible at database layer than application layer. One example of Code Pushdown can be calculating aggregates at database layer using aggregate functions in SQL rather than bringing all data in application layer and calculating the aggregates.

CDS offers capabilities such as relationship definitions like associations, built-in functions like currency conversion, extensions, semantic capabilities like annotations along with all SQL enhancements.

CDS was introduced in ABAP 7.40 SP05 and additional features were added subsequently in SP08, SP10, ABAP 7.50 SP00 and so on.

A sample and a simple CDS view looks like below.

@AbapCatalog.sqlViewName: 'DEMO_CDS_PRJCTN'
@AccessControl.authorizationCheck: #NOT_REQUIRED
define view demo_cds_spfli
  as select from
    spfli
    {
      key spfli.carrid,
      key spfli.connid,
          spfli.cityfrom,
          spfli.cityto
    }

The information we get from this is


  1. The name of the view is demo_cds_spfli
  2. At the top we have an annotation that tells us the name of related SQLView – DEMO_CDS_PRJCTN
  3. Another annotation says that Authorization check is not required
  4. It selected the data from table spfli
  5. The fields selected are carrid, connid, cityfrom and cityto with first 2 being the key fields

It is simple to read and understand, right? With this example, we can imagine a CDS view as a query written inside some kind of a reusable container which can be executed to get the data.

How to create a CDS view?

CDS views can only be created from ABAP Development Tools (ADT) in Eclipse. You can not create CDS views from SAPGUI.

To install Eclipse, check the post Install Eclipse for ABAP Development and if you are not familiar with Eclipse, visit Working with Eclipse for ABAP development .

1. Right click on your package, New > Other ABAP Repository Object

2. Search for ‘Data Definition’, select the node Data Definition and click Next

3. Enter Name and Description, then click Next

4. Select/Create Transport Request, click Next.

5. Select the template Define View and click Finish


6. The CDS view will be created and displayed like below.

7. Enter sqlViewName, edit the data_source_name and add fields. Separate the elements within { … } with a comma.

To use help entering the field name, use Ctrl + Space

8. Complete the CDS view like below.

@AbapCatalog.sqlViewName: 'ZJP_SQL_SMPL'
@AbapCatalog.compiler.compareFilter: true
@AbapCatalog.preserveKey: true
@AccessControl.authorizationCheck: #CHECK
@EndUserText.label: 'Simple CDS View'
define view ZJP_SIMPLE_CDS as select from spfli {
    key carrid as Carrid,
    key connid as Connid,
    countryfr as Countryfr,
    cityfrom as Cityfrom,
    airpfrom as Airpfrom,
    countryto as Countryto,
    cityto as Cityto,
    airpto as Airpto
}


9. Activate

10. To test the CDS view right click on your CDS view / Data definition and choose option

Open With > Data Preview.

11. OR, you can simply execute the CDS View with application toolbar button Run As.. and select ABAP Application.


12. Get the output as below.

In ABAP code, the CDS view can be used similar to database views or tables.

SELECT * FROM zjp_simple_cds
    INTO TABLE @DATA(cds_data_tab).
IF sy-subrc EQ 0.
  cl_demo_output=>display( cds_data_tab ).
ENDIF.